
Docker is a platform for developers and sysadmins to develop, deploy, and run applications with containers.
The official description of Docker… but what is a ‘container’ then? Well, in essence it is a ‘packaged’ application build from a ‘blue print’ image that run on top of the docker engine while providing us all the functionality it would if manually installed.
So what is the difference from that other thing they thought us about before to run multiple application on a single host? They called it ‘virtualization’ of application(s) via ‘Virtual Machine’ images? Well, in this regard Docker containers are the next generation of that exact idea.
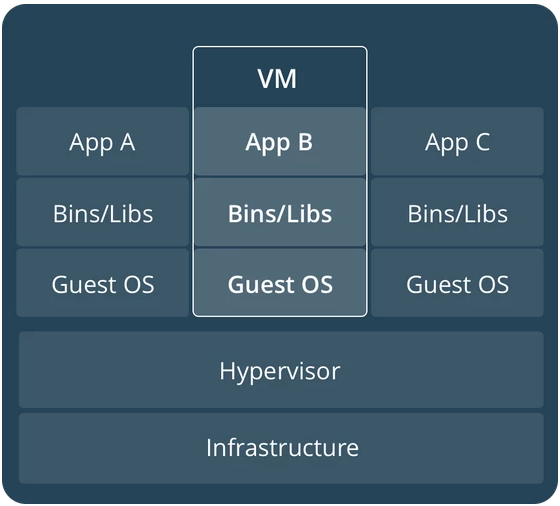
When we create a Virtual Machine (VM) to distribute our application in, we need to install a guest operation system, then install the software we need to run our application, for example Tomcat. We need to configure the Tomcat server and then deploy our application on top it. We then save a copy of this image somewhere and hand that preconfigured image to a client, so he can run that image with our application on it on his hardware machine(s). In short we get something like the following image shows if we deploy multiple VM’s on a single hardware instance.
Now if we would do the same for Docker, we would create a base docker image, but this would only consist of the Tomcat server we require along with the needed configuration for it and our application. Meaning we would not have to bother with running a Operating System for our docker container. All the functionality that would have been provided by the Docker Engine directly. So if we deploy multiple docker containers to a single hardware instance we would get something like this.
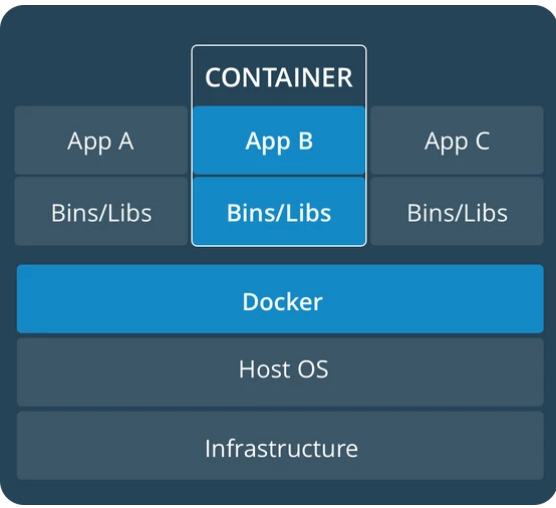
So we get the benefit of running multiple application on a single hardware instance without the overhead of having the provided a guest operating system for each application we deploy. Meaning we could deploy more application on the same hardware with Docker. This while still having a clear separation between all the different applications being run.
Ok, so now we have Docker on our machine, how can we get started? We do that by ‘pulling’ down the docker image of a container we want to run. This can be done via the command line with ‘docker pull ‘. Wait…, how do we find the ‘image_name’ of something i want to run a container of? Well, most of the time you will try to search for it via docker hub website or the build-in search of docker itself via ‘docker search ‘ command. In this tutorial we are going to use the MS SQL server image for linux, it’s name is ‘microsoft/mssql-server-linux‘.
docker search mssqldocker pull microsoft/mssql-server-linux |
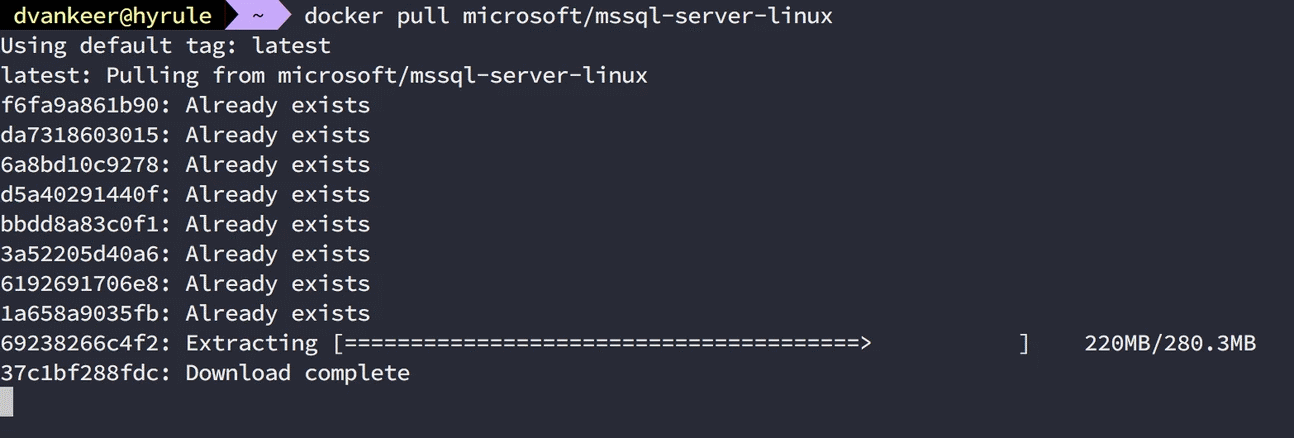
Once you pull down a image you wil notice a number of simultaneous downloads of different parts of the docker image, these parts are called ‘layers’ . Each docker image consist of a number of them and each of of them is a bundling of files (in ‘read-only’ mode). All of these layers are combined on top of each other to form your container. One small additional layer is added on top of these layers when you run them as a container, this being a thin writeable layer in which any changes you make to the running container are stored. (This also means if you destroy your container, all changes/configuration/logs/data/… go to /dev/null a.k.a. are destroyed as well)
Each image (and it’s read-only layers) have their own sha-256 which unique identifier it. These layers also make it possible for multiple containers to reuse the same basic binary/lib layers when using a image. This help save disc space on your machine (until we get nice affordable giant size SSD’s ![]() ) and also saves on bandwidth, since a layer you already downloaded for a previous docker pull will not be downloaded again.
) and also saves on bandwidth, since a layer you already downloaded for a previous docker pull will not be downloaded again.
Now that we have downloaded the image it’s stored on our machine along all other images, to get a list of all images available to run we use the ‘docker images‘ command to get a overview of them. Off course we have some tools available to manage all these images on our machine.
Ok, time to run our first docker container from the image we have downloaded. This can be done by directly running it with ‘docker run ‘ command which will create a new container for u (with a random name generate name like ‘wonderful_euclid’ , or you intermediately build the container yourself with ‘docker create –name ‘ and then run it with ‘docker start ‘.
docker create --name my_mssql_container microsoft/mssql-server-linuxdocker start my_mssql_container |
Congratulations, you have just created and run your first docker container.
Interacting with the container
Now that we have the container create and started we can list all running container with the ‘docker container ls‘ or ‘docker ps‘ command.
docker container lsdocker ps |

You will notice the container is up and running… or maybe not. It seems our container starts and shuts down again a bit later. Ow, did we brake something? PANIC! What happened? Let see if we can find out what is going wrong. What do we normally do when things are not working as intended? Indeed we look at the logs, but where are they stored? No need to search for them.. docker helps you on this as well. With the command ‘docker container logs ‘ we can get access to the logs. And low and behold… it seems we need to accept a EULA. Ah right, the docker hub page for the MS SQL server mentions that under the requirements section along with some others to make sure that the container would work properly.
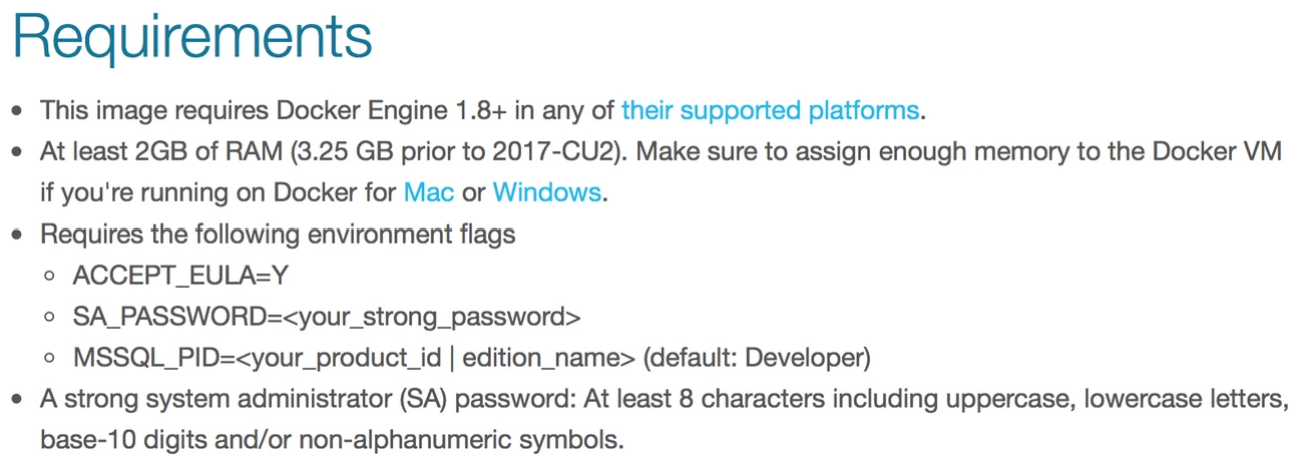
Ah! We need a number of environment flags to be passed to the container, so it knows that we accepted the EULA (yeah, those things again, lawyer speak available here). As always we just nod our head and say ‘yeah sure’. We also need to provide a ‘strong’ password for the SA account. But at least it provides a sensible default for which edition to run, for our usage the default of developer edition is good enough. (Reminder: any other edition you will need a valid license!).
So how do we pass these environment flags to the container? Let’s she what options we have when we create a container. This can be done by inspecting the docker command by adding –help ( this can be used for most commands with docker, so try it out! ) So we would run ‘docker create –help‘. … What?! So much text…, let see. Ah, here we go… we can use a parameter ‘-e’ or ‘–env’ to set environment variables. So the create our container we would use ‘docker create –name -e ‘ACCEPT_EULA=Y’ -e ‘SA_PASSWORD=’ microsoft/mssql-server-linux‘.
docker create --helpdocker create --name my_mssql_container -e 'ACCEPT_EULA=Y' -e 'SA_PASSWORD=Qwerty_123!' microsoft/mssql-server-linux |

Oh well, that did not go as expected. Now how do we get rid of that previous container we created… –help!
docker --helpdocker rm --help |
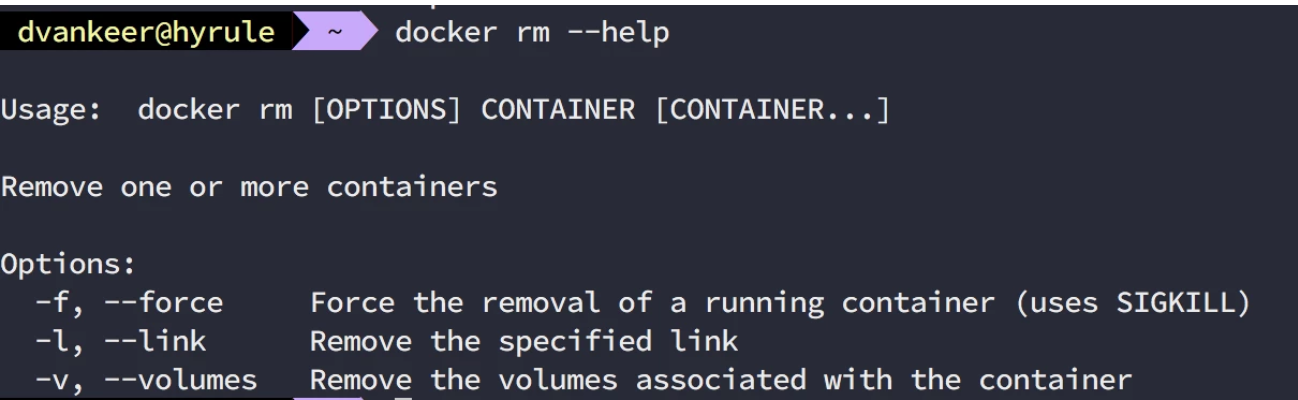
So we remove the container with ‘docker rm ‘ and create the new one with environment settings once more. If all goes well our container now stays up and running.. Let’s connect to our sparkling new SQL database server.
docker rm my_mssql_containerdocker create --name my_mssql_container -e 'ACCEPT_EULA=Y' -e 'SA_PASSWORD=Qwerty_123!' microsoft/mssql-server-linux |

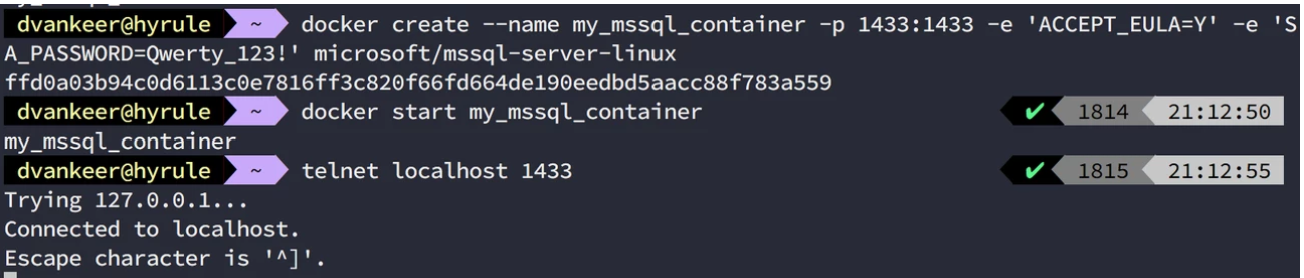
What?! Not running at all? It thought that container was up and running? Well, our container is up, but we seem to not be able to access the server port? It mentions the port on the ‘docker container ls’ output? We must have missed something, let’s check. It seems we can verify the container port configuration via ‘docker container port‘ command, which support inspecting of a port number itself.
docker container --helpdocker container port my_mssql_container 1433 |

We seem to not have published the port from our container. How do we do this? Once more, –help to the rescue. Ok, it seems we can provide a port mapping when we create the container by using the -p or publish flag, it’s does not really provide a good clue on how that to use it, but the syntax is ‘host_port:docker_port‘. So once more we remove our container, to create a new one with a extra options added. The create command becomes ‘docker create –name -p : -e ‘ACCEPT_EULA=Y’ -e ‘SA_PASSWORD=’ microsoft/mssql-server-linux‘.
docker rm my_mssql_containerdocker create --name my_mssql_container -p 1433:1433 -e 'ACCEPT_EULA=Y' -e 'SA_PASSWORD=Qwerty_123!' microsoft/mssql-server-linux |
And behold our first fully functional container. As mention above we can also use the run command with the same options to get the container create for us with a random name. But this covers the basics of docker usage to get your hands dirty with Docker. A handy reference or so called Cheat sheet of docker commands is available for you to use.
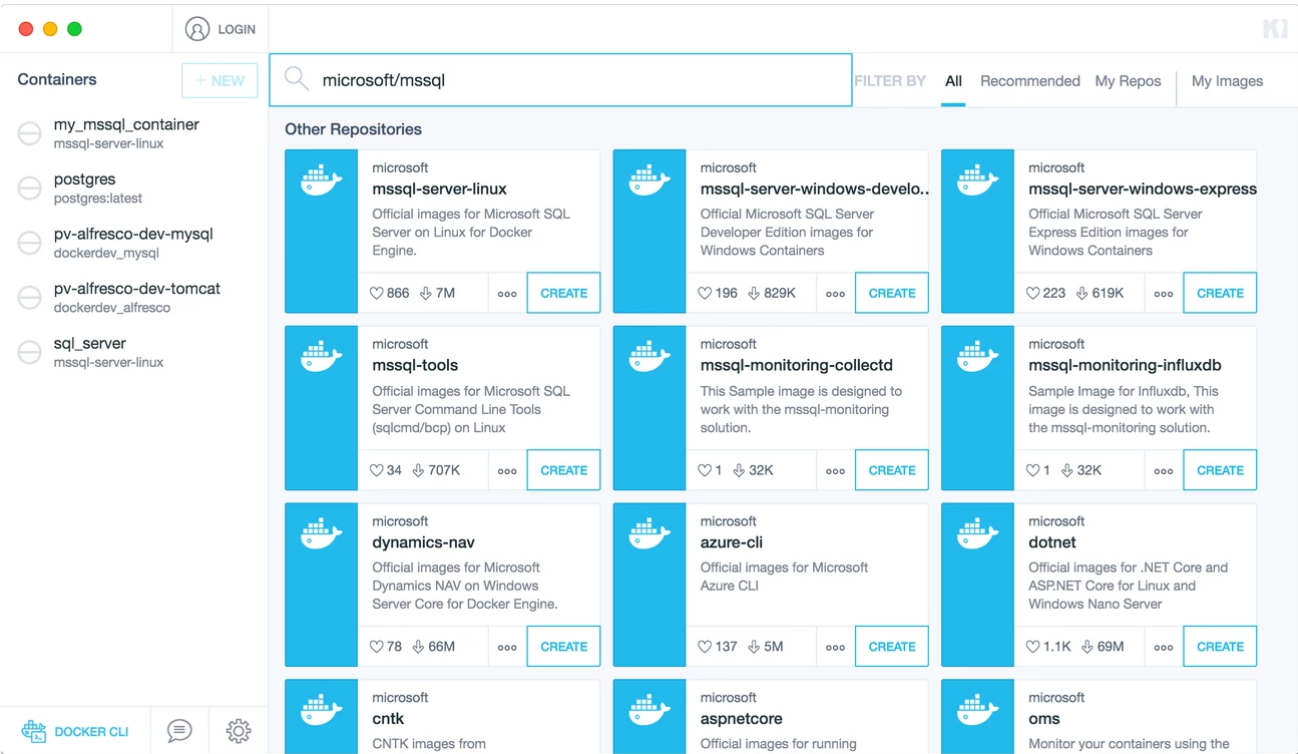
But dear sir, i don’t like all those command line thingies, i rather have something more visual to do all this? Isn’t there a option to do so? There is Kitematic (which is still in beta) which allows you to perform all of these in a GUI fashion. It should be bundled with your Docker CE installation (at least it is on the Mac).
Executing a program in a running container can be done by using the ‘docker exec -it ‘ command to run a executable. Where the ‘container id‘ can be found by looking at the output of the ‘docker container ls‘ command. You don’t have to type in the full container ID, you just need to make sure you uniquely identify the container in all running containers. In our case we have only one running container. So just giving ‘8‘ as container id would be sufficient to unique identify it. The container itself is still running it’s entry point command (a.k.a. what is run when the container starts) we ask a interact activebash terminal (or powershell for window container).
docker container lsdocker exec -it /bin/bash |

In our case we want to access the CLI so we can simple pass ‘bash’ as the executable name. Any executable that is on the configured ‘path’ of the container can be invoked directly, if not you need to supply the full path name to the executable. This allows us the manipulate the container like we do any regular linux system.
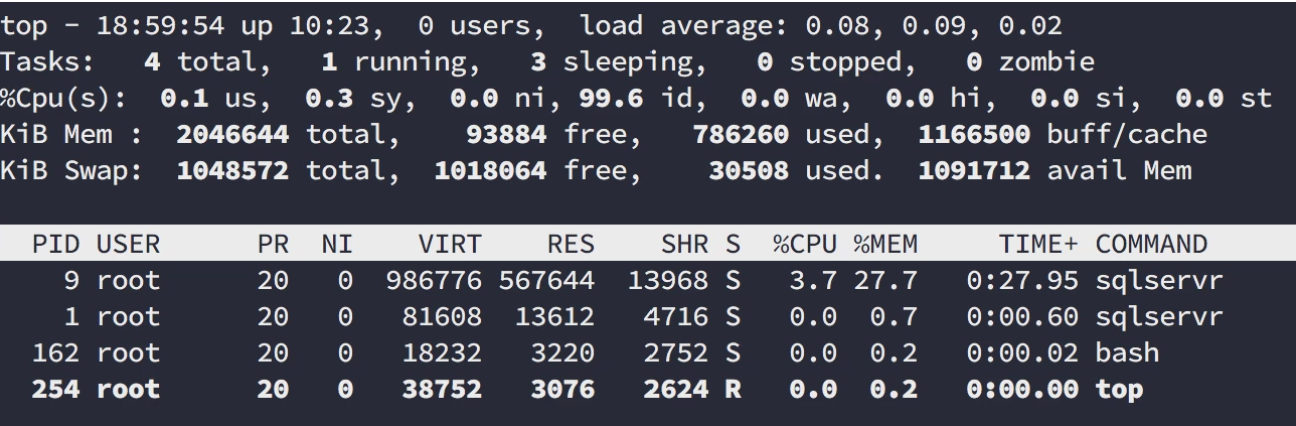
It also allows us the show you that container only run the tasks they need to run, we have 2 ‘sqlservr’ tasks up and the bash instance we started with our top command running. Easy to keep an overview ![]() .
.
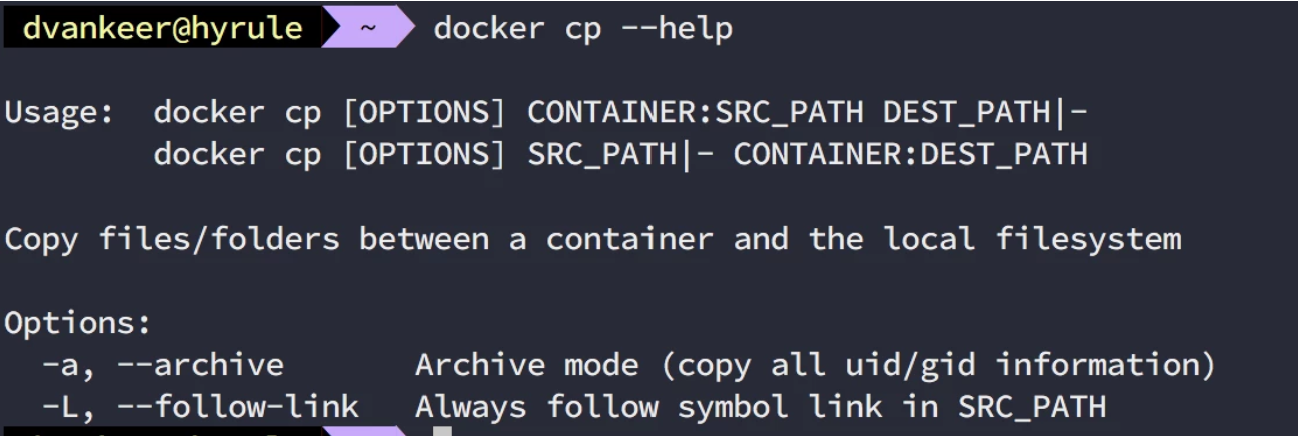
You have your favourite application running in a container, but you need to make a change to the configuration. You can do perform the change in the running container by using the CLI like we just discussed, but the creator of the container forget to provide you favourite text editor (… let the Editor war commence). We could go jumping through all kinds of hoops to get your favourite editor installed. Only to see it vanish once the container gets destroyed. Let us opt for a more sensible approach of editing the file on your host machine instead. This requires us the be able to get files out and into the container some way. That support is build in with the ‘docker cp‘ command.
So to retrieve the error logs from the MS SQL container we created we would use ‘docker cp : ‘ and to get a file from our host machine to the container we would use the reverse of the form, as in ‘docker cp :’.
Sometimes we do not know certain bits of information when we are creating a DockerFile, this can be information we need during the build of a image or even at runtime of the image. For these type of information we have the possibility to include ARG and ENV in our DockerFile so the missing piece of information can be added when we are aware of it.
- The ARG keyword is only used during the build of the image. It allows us to tweak the resulting image to a specific use case/environment.
- The ENV keyword is be used during the build of the image AND ar runtime of the container create from the image.

The usage of both these keywords can be done with a simple declaration of the variable in the DockerFile, and can be supplied with a default value if needed.
Sensitive information
Do not use any sensitive information in ARG variables, since they can be inspected via ‘docker history‘ command
To use these arguments we need to supply them with the build command, this can be done in the following fashion:
docker build --build-arg = docker build -t --build-arg = --build-arg = |
And to use the environment variable we need to supply those when we actually create/run the container itself, like we did with our MS SQL example we used before:
docker create -e '=' docker run -e '=' -e '=' docker run -e '' docker run --env-file= # Where environment_file is a key/value list of all environment variables you want to pass along. |
If you want additional information about the command we use, you can always visit https://docs.docker.com/engine/reference/builder/ this page contains all command and more including a more details in-depth explanation of them.
Some images on the docker hub can also expose their DockerFile, so looking into those you can get some information about how a image is being created on their end. It is also handy to get a feeling on how to create a DockerFile. So do look at some of those public DockerFile, they do give you some insights on what is possible. But the reference itself is complete, but takes time to read ![]()
Installation
Before we can start we need to follow the documentation on how to install docker compose, since it is not by default installed, so we head over to https://docs.docker.com/compose/install/ for the installation procedure and follow the instructions for your platform.
Compose with several existing images
Once we have our the compose command installed, we can start with the creation of a stack by creating our compose YML file, this can be done in the form of:
version: '3.6' # Depending on docker engine you have and which features you want available, use highest possible.# Definition of services (or containers to use)services: sql-server: # Self chosen name for a SQL backend image: microsoft/mssql-server-linux # Image to use environment: # Environment parameters as a list - ACCEPT_EULA=Y - SA_PASSWORD=Qwerty_123! - VIRTUAL_PORT=8080 ports: # Ports to expose on host machine - "1433:1433" rest-api:# Self chosen name for a API image: ports: - "9900:9900" depends_on: #If a container needs a other container to be active before it can perform it's job - sql-server ui: # Self chosen name for a frontend image: ports: - "80:80" depends_on: - rest-api |
This docker-compose.yml (default name used most of the time) file would create 3 containers for use based on the 3 existing images: the microsoft SQL server image, and 2 custom images for the API backend and the UI frontend. Each of their ports which have been EXPOSE‘d are mapped to the host machine their respective port.
Starting a docker-compose stack can be done by executing the docker-compose with the up command in the directory where our docker-compose.yml file resides.
# up can be used, which creates and starts the services for use in a single godocker-compose up# Or we can first create the services ourselves and then start themdocker-compose createdocker-compose start |
This will then create a default network for the containers to communicate on (since we did not defined a network ourselves in this example) and 3 containers. It will then execute a ‘docker run ‘ of each container with the port mapping we have provided. After all containers have started, all parts of the application can be reached on the host through their respective ports.
Once we do not need the containers anymore we can destroy the entire compose with the down command, which will remove the network and the 3 containers for us. If we want to keep the containers around for more usage later on we can just ask for a stop, which will keep everything around for a new start later on.
# Docker down can be used, which stops and destroys the containers (services) defineddocker-compose down# Or we can use just stop all the services, but keep their containers arounddocker-compose stop |
Compose with custom builds
But what if we do not have a exact image available to create our stack from, or we just want to do a couple of tweaks to a existing image before we use it. Must we have a image available to use in a stack? No, we can actually also build a image for use in a compose stack. This can be done by replacing in the following manner:
version: '3.6' # Depending on docker engine you have and which features you want available, use highest possible.# Definition of services (or containers to use)services: sql-server: # Self chosen name image: microsoft/mssql-server-linux # Image to use container_name: my-compose-stack-sql # Custom name for the container/service env_file: - sql-variables.env # File containing all SQL server ENV parameters (ACCEPT_EULA, SA_PASSWORD, ...) links: - "db,database" # host aliases to reach the sql-server image with on the backend network volumes: - logvolume-sql:/var/log networks: - backend # Backend network, for separate between SQL/API and API/UI rest-api: build: ./api # Sub directory 'api' containing a Dockerfile to build a custom image from. container_name: my-compose-stack-api # Custom name for the container being build depends_on: - sql-server links: - "api,backend,rest" # host aliases to reach the 'rest-api' image with on the backend and frontend network volumes: - logvolume-api:/var/log networks: - backend - frontend ui: build: context: ./ui # Sub directory 'ui' containing a Dockerfile to build a custom image from. args: # Custom build args to use with the UI Dockerfile - build_number: 1 - some_build_argument: - some_other_flag: "true" # Boolean values must be enclosed in quotes labels: - com.example.description: "Our super UI" - com.example.department: "Custom software development" - com.example.label-with-empty-value: "" container_name: my-compose-stack-ui # Custom name for the container being build ports: - "80:80" depends_on: - rest-api links: - "ui,frontend,app" # host aliases to reach the 'ui' image with on the frontend network volumes: - logvolume-ui:/var/log networks: - frontend# Volume definition for the entire stackvolumes: logvolume-sql: {} logvolume-api: {} logvolume-ui: {}# Definition of network used by servicesnetworks: frontend: driver: bridge # Default driver, makes a 'bridge' between the container network and the docker network 'frontend'. backend: driver: none # Disables external network from the container, so not accessible from the host it self, so 1433 is not exposed. |
This compose file will now build a custom image of our API and UI service based on a Dockerfile it finds in the api and ui subdirectories (from the compose file) and will first execute a docker build with those Dockerfile and then start the containers based on those newly backed images.
We also split up the networking of our images that instead of being a single network, we now have 2 networks available, a backend and a frontend network, whereby our api service is present on both networks. This to show that we can isolate our services from each other on a network level so the UI cannot directly reach the backend.
We also no longer have access from the host to our database and api, since we no longer expose those ports in our stack. Only port 80 is now available to our host, and potentially external clients.
Using compose to create a Docker Swam
Compose file can be used to build a docker swarm. This can be done by first initialising your docker engine as a swarm manager with the following command:
docker swarm init |

This will output a token which can be used to add additional nodes to the swarm. Once your swam is initialised you can then deploy your stack to it by
docker stack deploy --compose-file docker-compose.yml |
This will create all services which are mentioned in your compose file and will take into account the additional deploy configuration mentioned in the file to see how many instances of a certain service need to be available on the swarm
services: : deploy: replicas: 2 # 2 running container on the swarm of the service update_config: parallelism: 2 # Update all at the same time restart_policy: condition: on-failure # Restart if a container fails to respond |
Docker provides a nice tutorial on how to build your first swam. If you are interested please, take a look at https://github.com/docker/labs/blob/master/beginner/chapters/votingapp.md. This tutorial guides you in building your first swarm.